

A Perfect Guide On How To Schedule Instagram Stories and Posts in Facebook Business Suite
- LaKendra Coffman

- Nov 22, 2021
- 5 min read
In 2012, Facebook purchased Instagram. As a result, many firms' content marketing strategies include cross-promoting media posts between the two giants, Facebook's 2.90 billion monthly active users and Instagram's 1.074 billion monthly active users.
Facebook Company Suite is a new feature that combines admin chores for Instagram and Facebook business pages into one streamlined experience. As a result, company owners and brands can:
All comments, direct messages, and notifications are managed in one place.
Keep up to date on policy changes, new guidelines, and modifications to the terms of service.
At the same time, you can post on both platforms.
Manage the ad center and the commerce stores.
Change the page's settings.
Use a calendar to plan out your content marketing plans and schedule posts and stories ahead of time.
If you’re looking for houston best social media marketing agency for your business to handle your social media then we have got you covered. Five social media agency experts strategize your marketing plan according to the need of your business.

Since September 2020, the platform has made significant progress in streamlining content administration and executing marketing initiatives since its launch. In addition, for small businesses and professionals on a tight budget, as they now have free access to all of these features, the Facebook Business Suite is a game-changer.
With Facebook Business Suite you can link your Instagram account in two ways: on mobile and desktop. Each option has its walkthrough, which you can find below:
Mobile Device
Select Settings from the toolbox symbol at the bottom of the screen in Facebook Business Suite. In your settings, you can find Instagram and then connect it by pressing the Connect button.
Tap the blue Connect Account button on the next screen.

A confirmation page will display to ask if you want Instagram messages in your inbox to be accessible. If you need to, you can alter your mind later in your settings.
You'll be given the option of continuing using Facebook or logging into Instagram with your username and password once you confirm.
Suppose you want to save your login details after you check in. To proceed, choose either Save Info or Not Now.

To complete the setup, log in to your existing Facebook account or create a new one.
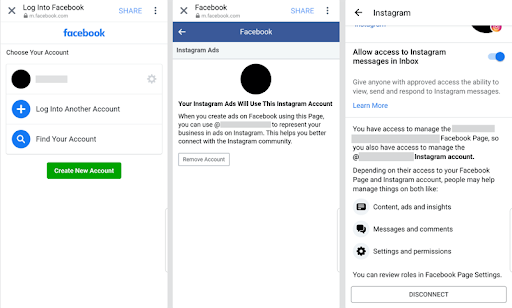
You can disconnect the account or update your preferences when you access your Instagram settings in Facebook Business Suite.
Desktop
On the desktop version of Facebook Business Suite, click the Settings button in the toolbar on the left side of the screen.
Then click the blue Connect Instagram button after selecting Instagram Connection.

On the following screen, you'll get a warning that "your Instagram account will be transformed" to a professional account. Connect your account by clicking Connect Account.
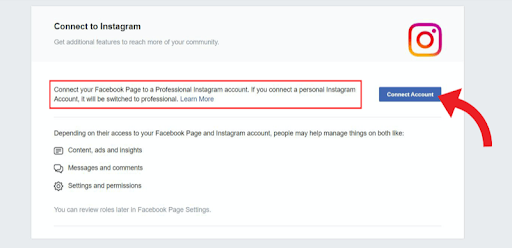
A popup will appear before you can connect, asking if you want to allow access to Instagram messages in your inbox. Of course, this option can permanently be changed in your preferences later.

You'll be asked to complete the connection after clicking Continue. If you're already connected to Instagram on your computer, your account should appear in the drop-down menu for you to choose from. Click Switch Accounts if that isn't the account you wish to link.
Now you'll need to enter your username and password. If two-factor authentication is enabled, you'll be asked to input a security code.
Now here is the walkthrough about how to use Facebook Business Suite for Instagram:
1.Schedule Instagram Posts
For managing both your Instagram and Facebook profiles, Facebook Business Suite has a lot of valuable options. The Posts & Stories feature will be the subject of this post.
Posts & Stories can be found in the toolbar on the left side of your screen. You'll be transported to the Posts page after clicking it, though you can switch between posts and stories at the top of the page.

On both Facebook and Instagram, you can see your published posts, scheduled posts, and draughts, as well as primary engagement data for your published posts.
Schedule an Instagram Feed Post:
If you've finished writing a post but want to save it for later, click the tiny arrow next to the Publish button. You may now schedule your Instagram post or store it as a draught and return to it later.

To publish your post Choose the time and date from the small window that will appear.

If you know you're going to schedule your Instagram post ahead of time, you can start in the Scheduled part rather than the Published section.
Schedule Post will open the identical new post page, but Schedule Post will start with the scheduling date and time immediately away.

Reschedule an Instagram Feed post:
You'll see it in the Scheduled area after you've scheduled a post (once you refresh the page).
Select the post you wish to reschedule from your Instagram feed and change the date and time. A preview containing post details and a general overview will be shown.
To access the drop-down menu with more options, click the ellipsis (...) button next to the post overview—Select Reschedule Post from the drop-down menu.
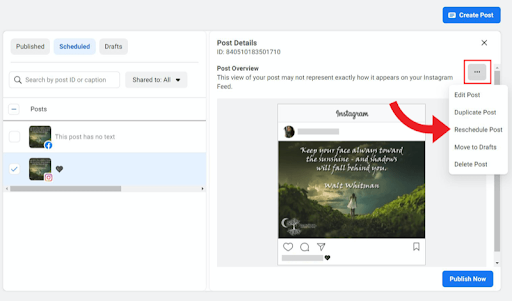
Reschedule after changing the day and time.

In Business Suite, delete a scheduled Instagram Feed post.
Then, use the same drop-down menu you used to reschedule. You can also delete your scheduled Instagram feed post from Facebook business suite.
Select the post you want to delete from the Scheduled section. Then, next to the post overview, click the ellipsis (...) to access the settings drop-down menu.

Click Delete Post. If you're sure, click Delete.
2. Schedule and Instagram Story
You can choose to schedule your article instead of posting it right away by clicking the small arrow next to the Publish button. This will bring up the choice for scheduling.

This will return you to the page of Create Story, where the Publish Story button (blue) has been replaced with Schedule Story. When you have selected all the desired actions, click the button to complete your Instagram or Facebook story schedule.
Reschedule an Instagram Story
You'll see the new tale waiting to be published at its scheduled date and time if you refresh the page under the Posts & Stories > Stories > Scheduled area.
To reschedule an Instagram story for a later date and time, go to the store you wish to reschedule and click the reschedule button. You won't see a checkbox like you will on your feed posts, so click directly on the article to bring up a preview on the right with narrative details and a quick synopsis.
Hire social media marketing agency in houston to boost your social media presence by optimizing your marketing strategy.
Click the ellipsis (...) icon next to the story overview to access more options via a drop-down menu.
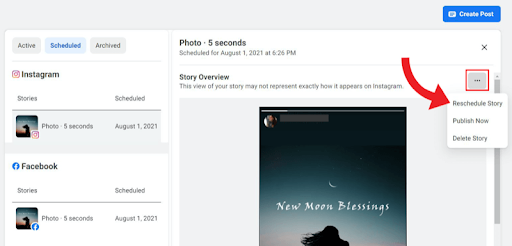
Adjust the date and time and click Reschedule.

The popup will vanish, and the screen will return to your pending stories in the Scheduled area. Again, you should notice a message indicating that your account has been scheduled at the bottom of the screen.
In Facebook Business Suite, you can delete a scheduled Instagram story.
In addition, you can remove your planned Instagram story from the same drop-down menu that you used to reschedule it from.
Delete the story from the Scheduled section.
Then, next to the post overview, click the ellipsis (...) icon to access the drop-down menu.

Select Delete Story from the drop-down menu.
After that, a popup will appear asking whether you're sure you want to erase your material because this action is irreversible. Click Delete if you're confident.
Conclusion
It used to be challenging to schedule Instagram stories, even with pricey third-party tools. However, marketers and business owners have applauded Facebook's move to make this functionality available in Business Suite.
The ability to schedule both Facebook and Instagram posts simultaneously was challenging to carry off in prior editions because there was only one text box accessible. In addition, it was a pain trying to tag and @mention other accounts on two different platforms in the same text block, and while hashtags were necessary for Instagram, they never caught on on Facebook.
As a result, users were forced to plan their Instagram and Facebook posts individually to include tags, mentions, and hashtags, defeating the objective of simplifying activity.
Business Suite makes cross platforming easy from a single platform. For better results find a social media agency in houston who excels in social media management.


Comments